OVH is a great choice for a cloud provider, but they don't offer a built in way to install a VPS from your own ISO. The operating systems they do offer run modified kernels and do not allow you to modify the installation settings. There are compatibility issues with some software and these kernels. They also don't offer many operating systems.
However, there's a fairly easy way to get past this limitation and install whatever you want. You can boot into rescue mode then run the installer for any operating system inside QEMU with the main disk passed to the virtual machine. Then, you can use Spice to connect to the virtual machine and proceed with graphical or command line setup.
The VPS that this blog runs on uses a standard Debian minimal install I used this method for.
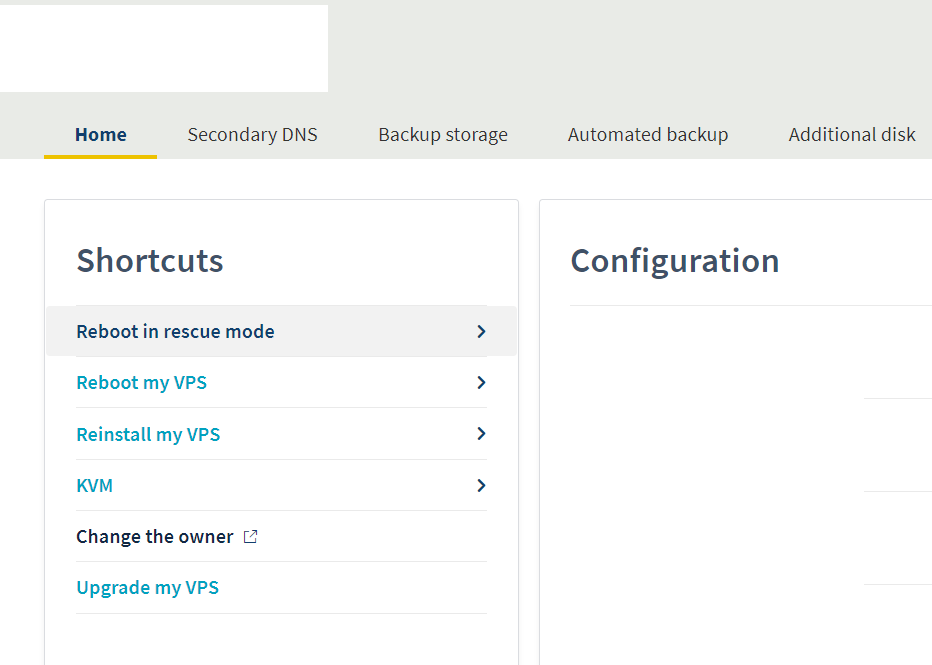
Getting into rescue mode
Boot into rescue mode from the OVH control panel
Setting up an SSH tunnel
You need to setup an ssh tunnel to connect with spice for graphical access to the installer.
Windows
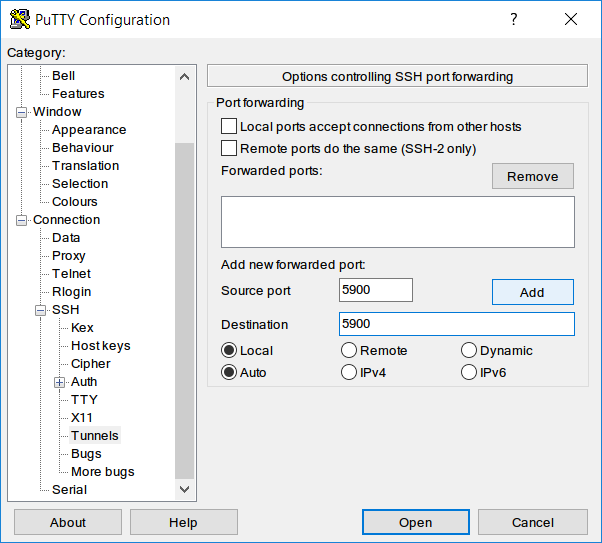
Remember to press the add button before you press open and log in.
Mac OS, Linux, other Unixlikes
Run this command replacing example.com with your IP address
ssh -L 127.0.0.1:5900:localhost:5900 example.com
QEMU Setup
SSH into your server and setup the latest QEMU version. The versions in the repos are old, and crash on some installers because of the new spectre and meltdown mitigations found in recent kernels.
Replace the second wget and the MYISO line with the ISO you wish to install
# Download the latest QEMU build
wget -qO- /tmp http://cdn.trick77.com/vkvm-latest.tar.gz | tar xvz -C /tmp
# Download the Debian 9.6 iso
wget -O /tmp https://cdimage.debian.org/debian-cd/current/amd64/iso-cd/debian-9.6.0-amd64-netinst.iso
# Start QEMU with
MYISO=/tmp/debian-9.6.0-amd64-netinst.iso
/tmp/qemu-system-x86_64 -netdev type=user,id=mynet0 -device virtio-net-pci,netdev=mynet0 -m 512M -localtime -no-kvm -drive format=raw,if=/dev/sdb -vga qxl -spice port=5900,addr=127.0.0.1,disable-ticketing -daemonize -cdrom $MYISO -boot d
Breaking down the command
# Pass through the network using virtio-net
-netdev type=user,id=mynet0 -device virtio-net-pci,netdev=mynet0
# Give 512 Megabytes of RAM to the guest OS
-m 512M
# Pass through localtime, disable KVM, pass through the main SSD
-localtime -no-kvm -drive format=raw,if=dev/sdb
# Run a spice server (VNC alternative)
-vga qxl -spice port=5900,addr=127.0.0.1,disable-ticketing
# Run the VM as a container, mount the ISO in the CDROM and boot from the CROM
-daemonize -cdrom $MYISO -boot d
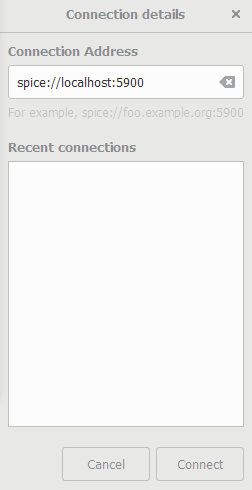
Installing the spice client
Windows
Install the virt-viewer spice client from http://virt-manager.org/download (get the x64 MSI version) and open "Remote Viewer". Type in spice://localhost:5900
You can try a different client here if you are on a different platform.
Configuring Network
You may or many not have working networking after you finish your install. If you don't, on most distributions editing /etc/network/interfaces will do the trick. Log in to the KVM from the OVH control panel mentioned above and edit /etc/network/interfaces.
# This file describes the network interfaces available on your system
# and how to activate them. For more information, see interfaces(5).

source /etc/network/interfaces.d/*

# The loopback network interface
auto lo
iface lo inet loopback

auto ens3
iface ens3 inet dhcp
For some reason, setting the main IP as static just doesn't work for me on Debian 9.6. However, I've had no issues adding the second IP as static. You can do this as such.
auto ens3
iface ens3 inet dhcp
iface ens3 inet static
  address 139.99.188.252
  netmask 255.255.255.255
  broadcast 139.99.188.252